YouTube University. Seriously: watch 30, 50, or a 100 videos. You will develop an intuition for what is happening. THEN read books (some good ones already suggested in other comments) and you will learn the concrete theory.
I want to emphasize the importance of developing the intuition behind the theory. It's vital, and the lack of intuition is why so many people find a complex, theoretical topic difficult. If they had spent time developing their intuition, then they would not struggle so much to understand and remember the theory.
Last, you have to build stuff (this also helps with the intuition). Decide that you are going to spend $300, and start buying parts. Don't go to Radio Shack, because you will (in my experience) pay an order of magnitude more for the same part. Shop on Aliexpress (or sometimes Amazon or Ebay). Who cares if you have to wait 6 weeks for the part to come in... do it today and it will be here about the time that you are ready for it. Never buy just one of anything. You can usually buy 10 or 20 for the same price that you can buy 2 or 3.
Most importantly: DO SOMETHING! Anything. Watch videos. Buy parts. Put things together, and then try to figure out why it's not working! Whatever you do, just don't stop. You will learn if you keep at it. At this stage for you, though, the most important thing is that you actually start.
Ben Krasnow's Applied Science - Teaches a lot more than electronics, but will also help you get some ideas (don't underestimate watching people do cool stuff to inspire you)
Thanks to this comment, I've now spent this past weekend binging the entire Ben Eater 8-bit computer series this far. Very entertaining, and I certainly learned a few things about computer architecture. I'm very tempted to do the project myself.
There is a very, very base level of electronics understanding for a couple things that are below the scope of what he covers. You're expected to understand what a pull-up resistor is, for example, and he briefly touches on RC circuits but I don't think his explanation would be sufficient for grokking the concept from scratch. Overall though, he is an excellent teacher and I think he makes concepts quite clear.
I personally ran a few parts at 2x speed, and skipped the Turing machine discussion entirely, but I'm sure the info is quite necessary to some people, so I'm glad he included it all.
Mr. Carlson's Lab is one of my favorites. Long form videos of custom devices, repairs and restorations of old, simple instruments are really interesting. On Patreon he details his designs and provides complete schematics and parts lists.
If you want to learn how to design circuits in a structured, analytical way (i.e., without heuristics and black magic), I can recommend this course: [1]. Note that this is really a more advanced course.
Personally I've been using Video Speed Controller, which seems more popular. One of the things that revolutionizes your viewing experience - learn the default keybindings (s -slower, d - faster, g - toggle fast (1.8x speed)) and never be bored again.
Always nice to know of other options. (The keyboard shortcuts for the extension I linked are + and -, with * being reset to default speed.)
Does the extension you linked do pitch correction as well? I wish I could find one that does for Firefox, too, if you happen to know of one. The only playback speed control extension I've found for FF doesn't.
Try setting the property manually using the JavaScript console and see if you get pitch correction. If not, maybe make sure you're on the latest version of Firefox?
low signal to noise ratio. The video log has 400 hour long parts in the series now, it's hard to pull valuable information quickly. It's not structured at all. "all over the shop", to use Dave's words.
> Afrotechmods
Nice introductions, but not very deep. "It's not the Volts that kill you, it's the Amps".
+1 for EEVBlog, he's an ex-EE who brings a ton of experience to a bunch of interesting areas.
As someone who's self-taught I found that the Art of Electronics was fantastic once I had enough basics. It may require a couple reads as it's quite dense but everything in there is solid gold.
The Signal Path - https://www.youtube.com/user/TheSignalPathBlog
A mix of relatively advanced and relatively simple videos, no rambling all content with great demos. If you have a test gear fetish this is your channel.
For those low on cash, or who want to dive in a little before seeing what soldering station, multimeter, power supply, oscilloscope etc. they want...
First buy a breadboard (or more than one). Buy the resistors and wires you need in the near future. You'll need a crimper pretty soon to cut the wires.
A good power supply is nice, but you can make due with a battery holder and battery at first, say, a 9 volt.
Look at some simple projects you can build, and get the capacitors, LEDs, inductors etc. necessary to build them.
When you want to start soldering things together, get a soldering station, solder and stripboards. Also get solder flux . Soldering is much less of a pain when you have flux, depending on what you are doing.
As the comment section here attests - a soldering gun is hot. Solder is hot. You have to be careful.
Digikey.com and Mouser.com have many, many electronic parts. Adafruit.com has a lot of cool projects and guides. In fact, I would recommend you watch some Adafruit videos, read some of their guides etc.
After you learn some of the basics, you can take a step up and get an Arduino and muck with that.
Digikey can be intimidating. The interface is kind of clunky, and for a beginner (like me!) it's overkill when you just want a couple of 10uF capacitors but get 60,000 hits for every variation of exotic capacitor ever made, and pricing for units of 1000s.
I find jameco.com very friendly for a beginner. Prices are about the same as elsewhere, shipping is fine, selection is fine for a beginner, and usually it's usually pretty easy to narrow the search results to just a few parts that have fairly clear differences. They have a pretty nice email newsletter too, essentially the only newsletter I allow through my spam filters, and the only one I've ever clicked on non-accidentally. The regularly feature hobby projects on their front page, from premade kits to more advanced stuff.
Get a good, name brand soldering station. Yes it will cost a few hundred dollars, but it will make a huge difference in your work. The cheap-o $15 soldering irons all produce horrible results and will shatter your confidence...
Get good, very thin solder. It will be expensive ($40) but will last forever and if paired with a legit soldering iron, will make a huge impact in your abilities.
I've looked around for a good soldering station and the best thing that I could find for the price/performance is the TS100. All the other budget (sub $100) didn't have a direct heating element. In total, I probably spent about $100 to get a stand and other things needed for soldering.
I'd second the TS100. It's ~$40 (given you can find a power supply for free, laptop bricks work fine. I'm using mini photo printer power supply which I found on the street + $1 plug + $3 worth of heat resistant silicone cable).
Warms up in seconds, open source and customizable firmware, takes very little space (kind of important to me since I don't have a dedicated shed/garage for the hobby). What's not to love about it for a beginner?
Apart from reading the buttons that control the device and writing the display, a digital iron needs firmware to control the feedback loop that maintains the temperature. Digital irons generally have PID based temperature regulation, unlike the crappy analog ones that have open loop systems (some analog irons have temperature regulation, e.g. Weller's old magnetic tips, but the crappy $5 irons do not). This requires a controller to supervise, but also means the iron heats up much faster and maintains that temperature while soldering.
Other features like a temperature graph or adjusting calibration and control parameters are handy additions when you have a nice display like in the TS100. Realistically though, people aren't really writing their own TS100 firmware with the exception of a few tinkerers. What it comes with is good enough.
Can you say where you can find a TS100 for ~$40? The cheapest I'm seeing is $50-55.
Also, are there different versions you need to worry about or are they all the same? I assume you only want a "MINI TS100" vs. some of the other knock off brands.
I use a Weller W61C (80-90€), which is a soldering iron (not station) that regulates its temparature using magnetic tips. Bit of an oddball, but it works fine even for soldering most SMD stuff, and it's just delightfully simple. Just plug it in and start soldering. Takes up basically no space too, since it's just a soldering iron with no station.
For really fiddly SMD items I have a cheap hot air rework station, but I don't need it very often - mostly when I have to desolder something SMD or solder on an IC with a thermal pad on the bottom.
I could not recommend the DSO203 in good conscience, it has almost no isolation of the input channels which makes it downright dangerous.
It's nice if you only do audio or low voltage stuff but the first time you're going to point your probe at something a bit more beefy and you will let the magic smoke out (good case) or worse.
I have a $99 100w Duratech one and it's perfectly adequate, no different from the $400+ Weller ones I've used in the past.
If you're just doing a bit of soldering as a hobby, though, get leaded solder. It works so much better than the modern unleaded stuff. Just don't breathe the smoke.
>If you're just doing a bit of soldering as a hobby, though, get leaded solder. It works so much better than the modern unleaded stuff. Just don't breathe the smoke.
That is personally not the tradeoff I'd make.
Lead is a special kind of poison in that it makes you stupid before it kills you: This is especially true of children, but I don't want any of it on my adult self, either.
Note, you can also buy lead-free 'low temperature' solder, which has a lot of the same properties of lead solder, though it's more expensive.
As far as I know, many lead free solders produce more toxic smoke than leaded solder because they contain different types of flux. When soldering the leaded stuff, the lead in it doesn't get evaporated anyways. The smoke produced during soldering is mostly evaporated flux.
"don't breathe the smoke" is just generally good advice, and it definitely doesn't become less applicable if you use lead free solder.
I mean, I ain't saying you should lick either one... and yeah, I don't know how much if any lead is released into the air during normal operation, but lead is pretty seriously toxic to humans, and avoiding touching the lead as I'm using it sounds kinda difficult. The flux? yeah, that isn't any good for you either, but I don't think it's in the same category as lead when it comes to toxicity.
Agreed on not licking either! I haven't been able to find anything conclusive saying how much lead you would get in the air when soldering, but the MSDS you linked says:
> Soft soldering temperatures (<450 °C) are generally too low to generate significant amounts of metal vapors, however, metal oxide fumes/dust or flux decomposition fumes can occur.
> RECOMMENDATION:
> For frequent or prolonged soldering processes, use of a local exhaust system to avoid exposure to thermal decomposition products. For example, use fume cabinet, a hood on a flexible arm, or tip-mounted fume extraction system on the soldering iron.
So if you're only occasionally soldering up a circuit board, you stay well ventilated, and you keep the solder temperature below 450°C (my soldering iron is usually set around 280°C - 300°C) then the risk seems pretty negligible. If you take up circuit board fabrication as a career then obviously you'd take it much more seriously. I should still give unleaded solder another shot, though - maybe it's improved since last time I tried it.
>So if you're only occasionally soldering up a circuit board, you stay well ventilated, and you keep the solder temperature below 450°C (my soldering iron is usually set around 280°C - 300°C) then the risk seems pretty negligible.
I think the danger is in touching the lead directly; it's a soft metal and comes off on your hands to a certain extent, and my understanding is that some of the dross can end up as lead dust.
According to the NIOSH, just washing with soap is often not effective for removing lead from your hands,
>I should still give unleaded solder another shot, though - maybe it's improved since last time I tried it.
I'm starting to look into different formulations; I'd start with the SAC305 formulation. It's like 3.5% silver and slightly more expensive, but still cheap. and widely available.
Get either a Hakko FX888D or a Weller WES51. I personally prefer the Hakko, but both are excellent stations that cost under $150 which will serve you for years if you take care of them.
A note - soldering stations usually come with a cheap conical tip as a starter tip. Pay an extra $20 or so to buy two chisel tips: a tiny one for fine work, and a big one for larger work. The flat surface allows you to apply more heat to the joint. Take care of your tips (ie: keep them tinned, don't leave the iron on too hot, and don't scrub too hard with the brass sponge) and the tips should last a few years without trouble.
A thing to say in Weller's favour: They stock parts forever. My Weller station is somthing like 35 years old, now, still works perfectly. But someone damaged the sleeve that holds the tips in place. No problem, for a modest cost I could still buy a replacement, even though that particular part no longer fits any contemporary model of iron Weller sells. Kudos to them!
The WES51 as a solid soldering iron. You can get ones with a display readout but it's less useful than you might think. Most of the time you just set the temp and then switch tips if you need more or less heat transfer. Need to solder something large or stubborn? Using a phat chisel tip is better than upping the temp. Too hot and the rosin quickly oxidizes and turns to varnish, which prevents the solder from wetting.
Also tips, get a hooked tip, about 80% of the time it'll do the job.
YiHUA (or other genetic Chinese brand) 936B clones are plenty cheap (less than $30 shipped IIRC) and are actually quite good.
Yes, the Hakko's are really nice and quality, but the Chinese clones are honestly 'good enough' for many people. They're workhorse machines that see tons of use in their native market.
I recommend the TS100 (<$100 budget) and JBC ($300-$500 budget). After getting a decent soldering iron I never looked back. Yes its expensive, but so are the parts you destroy with the crappy $30 irons, or the frustration of soldering big copper pads and the tip cooling down in the middle of the process.
Regarding the JBC, after the initial investment, various the tips (chinese clones ~$5 or even originals ~$25) add so much incremental value to the soldering iron base for such a little extra cost.
Hakko and Weller are a solid choice, but I purchased a programmable TS100 last year and haven't looked back since. I solder a lot on drones and it's just delightful to work with: so light, quick to heat, it has an OLED screen built in, changeable tips and it's programmable. All that for under $50 there's nothing that I would recommend more.
If you're soldering for a living there are probably better suited soldering stations, but if you're just starting out: get this one.
Also: don't skimp on tin. Good quality soldering tin makes a huge difference!
buy a weller and use appropriately sized solder for the application (very thin solder sucks really bad if you are doing something like throughhole or larger parts...you will have to apply the heat longer to apply enough solder)
> The cheap-o $15 soldering irons all produce horrible results and will shatter your confidence...
I would make the opposite argument that if you can get great results from a cheap-o soldering iron, your confidence and ability will soar thereafter.
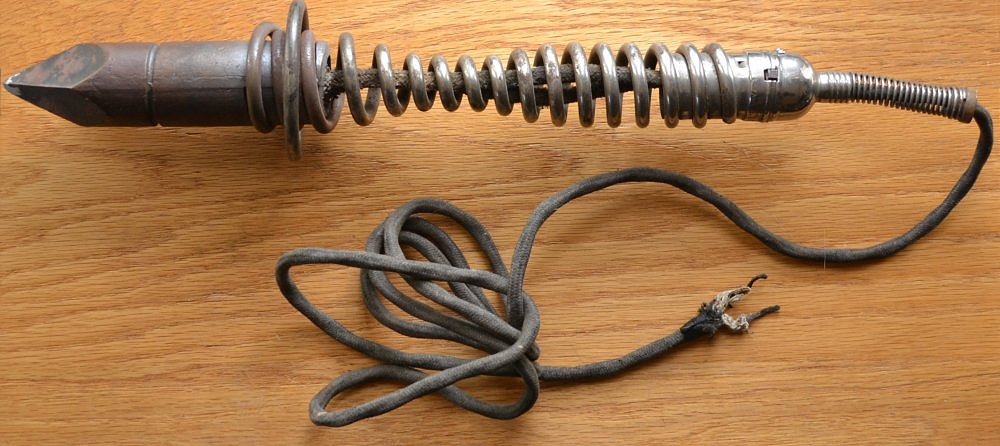
Recall that, back in the really early days, soldering irons were large affairs, consisting of a large block of copper heated via a gasoline or kerosene torch, with a large wood handle and a steel shaft:
Now granted, connections were mostly "free-air" and not PCB based or similar. Also, some of those irons were meant for soldering sheet metal, not really electronics or electrical work - but that's what people had at the time...
When I learned to solder thru-hole electronics, I learned with what could be called a "cheap-o" soldering iron; something like this (maybe not as nice looking):
I still have it, and still use it occasionally. It takes "forever" to heat up (about 10-15 minutes), and the tip looks like hell. But for thru-hole construction, it works great. Once you know how to use it, you can solder like a champ.
Would I use it for SMT rework? No. Basically it's virtually worthless for anything with less than 0.1" pitch, unless you're removing parts and just need to dump a lot of heat in a small area.
The key to successful soldering is knowing how to control and place the heat where you need it, and flowing the solder into the joint properly. Most make the mistake of not tinning their iron or the part leads, then trying to flow the solder using the tip of the iron, where all it does is stick the iron tip. Instead, you have to heat the component's lead(s), and flow the solder using the heat on the lead(s). Tinning both the iron and the leads helps with this as well. Flux can also help, but if you use a decent flux-core solder (preferably 63/37 ratio tin-lead), flux should rarely be needed. A paste flux is useful though for cleaning the tip of the iron, especially when shutting down for the day.
It's kinda like arc welding. Sure, MIG can be easy to learn. But if you really want to understand, start with rod (stick) first. Yeah, you'll stick the rod continuously, cussing a storm up at first. But after a while, you'll develop the knack of keeping that weld pool just right and moving the rod while feeding it in, without sticking. Once you've done that, MIG is nothing...
> I would make the opposite argument that if you can get great results from a cheap-o soldering iron, your confidence and ability will soar thereafter.
I tend to disagree, when you're learning is not the time to be fighting your tools.
I would add a logic analyzer before oscilloscope. You can get good ones for pretty cheap now. https://www.saleae.com/ It is so nice to be able to see what is actually going on when debugging interfaces.
for learning electronics? why? I'd say an oscilloscope way before a logic analyzer as it allows you to see what circuits are doing. Learning what analog circuits are doing is much more useful for learning than seeing digital signalling.
I think most people getting into electronics won't be doing analog designs. They'll probably be messing around with various sensor devkits (sparkfun, adafruit, etc.) and Arduinos/RaspberryPis/ESP8266. With these you'll be messing around with primarily I2C and SPI which is why a cheap logic analyzer is cool also they are much cheaper than an oscilloscope and some have some analog functionality.
> With these you'll be messing around with primarily I2C and SPI
On the other hand, if you get the right cheap oscilloscope, such as a Rigol 1054z, which goes for $350 [1] and add the $180 "serial bus analysis" option, the 'scope will know how to trigger on and decode I2C, SPI, RS232 protocols.
If you don't mind using cracks, you can enable the serial bus analysis option for free, and also double the memory and the bandwidth.
Rigol's response to the crack is interesting. The cracks work because they used a key length for a cryptographic key in their firmware that is short enough to fairly easily brute force. It's hard to see how this could be accidental. Further suggesting that it is not accidental is the fact that they could have easily fixed this once people figured it out, but they have not.
That has led to speculation that they purposefully did this, so that hobbyists could easily crack the thing and get all the features.
Professional users could also crack it, but they would be reluctant to do so, because of potential liability issues. If you are a pro, and you design something the ends up used in a system that causes harm, and it comes out you were using hacked test equipment, the plaintiff's lawyers will be all over that.
If that is the case, it was an excellent strategy. Over on /r/electronics or /r/AskElectronics, you ask for a 'scope recommendation as a hobbyist or student, and almost all the responses will say get the DS1054z and crack it.
maybe, but even with those, unless it's because you really want to look at I2C / SPI, mostly that just works.
I'm not sure what people mean when they say they want to learn electronics, whether they are talking about getting a micro based kit and hooking things up to it and programming it or whether they want to understand circuits and components and how they work. If it's the latter, then go with a scope.
True, it's good to see the scope while poking around. Also scopes can do higher voltages than salaes' analyzers. But to their defense, the newer analog + digital analysers are really decent for $200.
Annnd they doubled their prices, oscilloscope it is.
Why not both? I somewhat recently purchased the EspoTek Labrador. It's both and a lot more for roughly $30. Of course it's nowhere near as good as single purpose/professional grade equipment, but for learning it's a great device.
Depends what you're doing, but maybe yeah if it's just digital stuff. 10x faster to trace issues using a logic analyzer than looking at 1 or 2 signals at a time.
The last time I looked into power supplies they were somewhat cost prohibitive for my twice a year hardware project habit. Have things changed? Are there some good bang for your buck supplies that can be had for a couple hundred bucks or so?
I was referring to a bench supply, although maybe I should have looked before asking. The number of DC bench supplies available in the $100 range is huge. This seems like a big price shift over the past couple years.
i suggest (as someone who still knows nothing about electronics) that oscilloscopes are a "must have." cathode-ray-tube style from ebay are more affordable.
also, Horowitz and Hill, to echo what i suppose is mentioned elsewhere.
I found my set of Engineer PA-09 crimp pliers does a better job than one of the cheap ratcheting crimping tools. Got them to do the smaller JST crimps, but they do Dupont pretty well too.
I essentially started electronics because of Big Clive. I found him entertaining, and his curiosity rubbed off. It's nice to have a simple, practical context for learning the basics, and his channel provides that in spades.
As for gearing up, I think $300 is way on the high end. A cheap $10 temp-controlled soldering iron, solder, flux, and flush-cut snips are most of what you need. I'd add in some assorted parts bags; you can get like 20 each of dozens of different resistors in a big sack for $15 on eBay. Do that for common stuff like LEDs, capacitors, transistors, and some arduinos and such, and you're good to go. Could be well under $100 for a good start.
His YouTube videos are incredibly accessible despite their technical depth. Once you get your feet wet with the basics, I highly recommend his videos. They are a treasure trove of information while simultaneously being easy to understand & follow. I wish my professors could teach like him.
This way of learning resonates a lot with how I learnt to properly cook. I could cook some simple enough dishes fine, but then I got really into watching a few cooking channels on YouTube and (with a bit of practice) noticeably improved.
It’s actually mad the amount of stuff you pick up through watching someone who’s good at what they do doing it and explaining it well, prodding at your understanding while they do it.
Binging with Babish/Basics with Babish
This guys shtick is that he recreates dishes from film/tv. He used to be a video editor iirc so the production quality is great and it’s very focused on the food itself (as you can tell by you very rarely seeing his face). As he got more popular he made the Basics series. Can’t recommend them both enough
Binging: https://youtu.be/bJUiWdM__Qw
Basics: https://youtu.be/Upqp21Dm5vg
Food Wishes
This is done by a guy called Chef John. Similarly to Babish he’s very focused on the food/process, and is very good at explaining some principles and encouraging you to think for yourself (he’ll often not give precise amounts and encourage you to add some, taste, add more if needed). His voice/inflections can be grating when you first watch his videos but you grow to love it. He’s got an endless supply of all sorts of dishes so he’s a great resource
https://youtu.be/ifWWRZSWS18
It’s Alive with Brad/Bon Appetit
This is a series from a channel about making pickled/fermented food. A lot more specific but it’s hilarious and I’ve made some of the stuff from the series and really enjoyed it. Even if you’re not gonna make any of this stuff I’d still recommend these for pure entertainment value.
There’s also a bunch of content on Bon Appetit (the channel), some of Claire’s vids are very good, mostly baking-related.
Brad: https://youtu.be/UGjCeAbWKPo
Claire: https://youtu.be/yxGczEE3NSw
Other channels I’ll look at include Alex French Guy Cooking and J Kenji Lopez Alt. Alex does a lot of cool stuff on Ramen, and is quite experimental, exploring different techniques for doing things etc. Kenji is very scientific with how he cooks things and explains the reasoning behind, say, why you should shake your boiled potatoes before you put them in the oven to roast them.
Alex: https://youtu.be/HzIdk8UHHUU
Kenji: https://youtu.be/argKpeiKFfo
My wife likes watching cooking shows but it is more about the competition and elimination/personalities than the technical side of the cooking etc.
I like to cook, she doesn't really - she bakes so it works out okay as a team - and I kind of watch along but these links are way more relevant to me personally.
Fantastic recommendations! This hits my favorites out of my wife's cooking viewing and they've both entertained and improved our cooking and the enjoyment of creating memorable dishes.
+1 for Alex French Guy Cooking (mentioned in sibling comment). I like his method of chopping onions; most of the onions I chop don't need to look particularly pretty, so it's great.
Also, You Suck At Cooking https://www.youtube.com/channel/UCekQr9znsk2vWxBo3YiLq2w is one of my guilty pleasures. I think he's hilarious and figured it was purely a spoof channel, but then I actually watched a couple and if you don't mind and/or enjoy his fooling around (and have a moderately well-tuned BS detector to tell when he's fooling around) the recipes are pretty good. I particularly like how he doesn't spend a whole lot of time measuring things out. It's a great counter to the precision generally present in recipe books, which used to be a big hangup for me (pipettes broth into Pyrex measuring cup "gotta get EXACTLY 1 C broth in this soup!" => dumps broth into drinking glass "Eh, close enough!") I'm still adjusting to that style but it has already saved me both time and unnecessary tension. (Seriously. The error margins in most cooking seem ridiculously large to me!)
No, no and no. If I watch even 10 Youtube videos without building anything, I give up.
I'd love to learn electronics. You know what I need? ONE Youtube video, and a single kit I can buy on Amazon.com to build what's shown on the video. Then a second video, and an exercise (either with the same kit, or something else).
That's how I would stick to it.
Too often, people like you think that the issue of learning is about finding information. It's not! In the age of internet and being one or two click away from everything, the issue is simply to keep the motivation high.
This is true. I think the key is to find something that you really want to build. This is easier to do as a kid, because a lot more of simple things are exciting.
Thank you for your comment on the "How to Self-Learn Electronics?" Hacker News thread.
"YouTube University. Seriously: watch 30, 50, or a 100 videos. You will develop an intuition for what is happening. THEN read books (some good ones already suggested in other comments) and you will learn the concrete theory."
I have been thinking a lot about it in the past few days, and it makes a lot of sense, and may be very helpful in helping me increase my learning speed. I am not referring to electronics just yet but learning in general. Whenever I want to learn how to make a new dish in the kitchen such as fried tofu, kettle corn, carmel corn, etc. I will simply watch 5-10 YouTube videos and just absorb what makes sense, and I think this may be called intuition and it is nice to realize what is happening.
In regards to learning software engineering though, I don't do that as often, although I did with HTTP/2 and it was fantastic. I do watch a lot of videos but I also slog through a lot of technical books at a slow-reading style pace. It is very helpful BUT I see that I will be limited in my learning throughout my life to just a few subjects at this rate.
I am going to now follow your advice and watch 5-10 hours of videos on new topics before doing the deep dives into the books and still deep dive, but now I will have that intuition.
Thanks for sharing that, it has had an effect on my future!
"Shop on Aliexpress (or sometimes Amazon or Ebay)."
Buying from potential(probability:good on listed sites) 2nd & rejected lots will torpedo any initial enthusiasm.
Go to mouser.com.
Not an advert, nor affiliated, just happy with their products & service.
>Do you think the same intuition can be developed watching videos for things like woodworking?
Absolutely, whether it's electronics, woodworking, cooking, mechanics, or whatever skill you choose, you can develop an intuition for a particular craft by watching others perform it. Even if it's not something inherently educational you'll still pick up bits and pieces of information, and things like technique and methods to approach a problem become evident the more you watch.
If you're looking for some suggestions on woodworking channels, I wholeheartedly recommend Matthias Wandel[0], as well as John Heisz[1], as these channels are both very approachable and are often presented in a 'how to' fashion, providing plans for their work in the descriptions. There's no shortage to channels dedicated to teaching woodworking or home improvement if you just look for them, although some are less approachable than others, an example of this would be mtmwood[2] which is presented in Russian although knowing Russian is not necessary to understand the videos. He tends to make some pretty neat and complicated cutting boards[3].
Although I must stress, don't skip the book learning with something like woodworking or home improvement, knowing how to operate power tools safely as well as taking personal protection seriously is absolutely essential.
Thanks for the suggestions. The thing I like about youtube is unlike other things like books, articles, that I always bookmark to look at later, I can immediately immerse myself into youtube.
Any recommendations for home improvement? Or maybe other hobbies you find interesting like watch making?
I want to emphasize the importance of developing the intuition behind the theory. It's vital, and the lack of intuition is why so many people find a complex, theoretical topic difficult. If they had spent time developing their intuition, then they would not struggle so much to understand and remember the theory.
Last, you have to build stuff (this also helps with the intuition). Decide that you are going to spend $300, and start buying parts. Don't go to Radio Shack, because you will (in my experience) pay an order of magnitude more for the same part. Shop on Aliexpress (or sometimes Amazon or Ebay). Who cares if you have to wait 6 weeks for the part to come in... do it today and it will be here about the time that you are ready for it. Never buy just one of anything. You can usually buy 10 or 20 for the same price that you can buy 2 or 3.
Most importantly: DO SOMETHING! Anything. Watch videos. Buy parts. Put things together, and then try to figure out why it's not working! Whatever you do, just don't stop. You will learn if you keep at it. At this stage for you, though, the most important thing is that you actually start.